
Flower Photography
Seven tips for flowers, people, travel, and scenic photos
By Marion Owen, Fearless Weeder
for PlanTea, Inc. and
Co-author of Chicken Soup for the Gardener's Soul
FEATURE ARTICLE:

Tom Hanks' "Power of Four" solution
More good stuff:
Who is Marion Owen?
FAQs about PlanTea
Search Marion's articles, tips and recipes
Why grow organic?
News and press releases
Read love letters
How to link to this site
Need a speaker?
How to contact Marion
Visiting Alaska?
Come to Kodiak Island!
Go to home page

Marion's UpBeet Gardener
Newsletter has been
replaced by Marion's blog
which you can find at:
www.marionowen.wordpress.com
 When
people catch me indoors on a sunny day, they ask me, "Why aren't you outside
taking pictures?" Truth is, when the weather man predicts the sun will
come out, my camera usually stays in.

Bright sunny days are wonderful for picnics, but they're not so hot for taking pictures in the garden. Give me an overcast day, and my camera and I are happy campers. But what if the flowers you've been waiting for all season are in their prime right now, and cloudy skies are not in the forecast? There are ways to get around the sunshine.

Field of lupine in fog, Kodiak Island. Photo by Marion Owen
 Here
are seven tips that professionals use to help you make the best of a sunny
situation. Then, I'll describe some low-tech photo equipment that you
can make from household items and add to your camera bag of tricks. Whether
you use a "point and shoot" or a large format camera, these tips will
dramatically increase the number of "keepers" in your photograph collection.
Contrary to popular belief, a beautiful day doesn't automatically make beautiful pictures. This is probably one of the biggest misconceptions that people have about photography. Let's explore this idea, starting with these two photos. The one on the left is taken in bright sunlight. See how the light reflects off the shiny leaves and how the dark shadows become distracting elements in the whole picture? These conditions won't put your favorite blooms in the best light, if you know what I mean.


Rose in full sun (left) and in diffused light (right)
Now look at the photo on the right. The rose is evenly lit. There are no distracting shiny spots on the leaves and no deep shadows. You can practically feel the velvet petals. The soft, even light creates richer colors and textures, and it makes it easier to take accurate light meter readings.
How to make the best of a bright situation
1) Timing is everythingThe easiest solution to extreme lighting is to simply avoid the midday sun. Try taking your pictures early in the morning before the breezes start up and when the leaves are still covered
 with dew. For a warmer, more pleasing light, wait until late afternoon.
2) Wait for an overcast or foggy day
Since the diffused light of an overcast sky or hazy sunlight is ideal for flower photography, it can be worth waiting for the right light. Incidentally, overcast days also provide the best lighting for portraits. We've all seen nose shadows across cheeks and eyes disappear in ball cap shadows. If it's partly cloudy outside, set up your photo and wait for a cloud to pass in front of the sun. Make sure you adjust your exposure to compensate for the drop in light intensity.
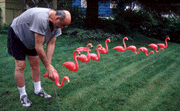
An overcast sky is ideal for taking garden photos -- and portraits.
(Check out the legs. No, I mean on the flamingos!)
3) Bring in the clouds
What if you can't wait for the clouds to roll in? It's simple: Take charge and make your own overcast day. This is especially handy when you're shooting closeups of objects. You can make your own "soft box" lighting conditions by blocking the bright sunlight with a diffusing material. Here's how it works: Take a 12 to 18-inch square section of wax paper, bedsheet, T-shirt, white garbage bag, frosted glass or hardware cloth. Hold it (or have someone hold it for you) between the sun and the flower you're photographing. See how the diffuser softens the harsh sunlight? Suddenly, the shadows are less prominent and not as distracting. And while you're taking pictures, take one with the diffuser, and one without, just to prove it to yourself. I think you'll be amazed at the difference.

To make a diffuser to carry around the garden with you, take a wire coat hanger and pull the bottom of the triangle out until it forms a square. Keep the hook intact as a handle. Now stretch a white plastic shopping bag over the wire square. Tie the bag's two handles around the hook to secure it in place.
When it comes to light, softer is better
4) Eclipse the sun to fix distracting backgroundsThere are times when you might want to completely block the sun. For example, the flower might look stunning, but the background is too busy and steals the show from the subject. In this case, you can simplify the background by creating a darkened area behind your subject. Here's how it's done: Hold a piece of mat board against the sun and move it around until it creates a shadow behind, but not on, your subject. Meter on the subject and take the picture. (If you don't have three hands, it helps to use a tripod). Manipulating the background like this is an old photo studio trick. In this case, the resulting photo shows the flower standing out against a dark background.

The dark background makes a dramatic backdrop
for these hanging basket begonias.
5) Foiling the sun, when diffused light won't do
There are also times when you might want a bright sunny look in your images. Trouble is, you can't see much underneath the flower because it's all in shadow. Solution: Bring out the aluminum foil. The idea is to reflect light back into the shadow areas. Believe me, this simple trick creates amazing results. Reflectors can be made from any bright surface such as white mat board, aluminum-backed insulation, foil wrapping paper, or a mirror. To add a warm cast, choose a gold or copper-colored foil.
6) Backlight for a dramatic look
To set up a shot, many how-to photography books recommend placing the sun at your back. This is a worthy guideline, but for the sake of exploring artistic expression, let's break this rule of thumb. One way to make flowers really glow, is to take a picture of them when they're backlit -- that is, with the sun facing you and shining through the flowers. To set this up, face the sun so it's also behind the flowers. Increase your exposures, by one, maybe two stops. Take several shots. Depending on your exposure, backlighting can create a range of effects, from beautiful silhouettes to a stained-glass look. This is especially noticeable with transluscent flower petals like poppies, nasturtiums and pansies.
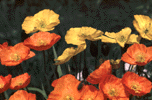
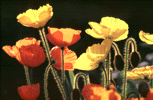
Frontlit Iceland poppies (left) and backlit Iceland poppies (right)
7) Last, but not least
This last point is so important, I regularly pass this along to my photography students. Photography isn't worth the effort unless you are enjoying yourself. Have fun with it. Experiment with diffusers and reflector materials. Get down low and shoot through flowers toward the sky. Include people and try different close-up techniques. Use slow speed film which provides better color saturation, and promise me you'll try to avoid putting your subject in the center of the picture!
Now, here's your homework assignment: On a sunny day, go on a photo treasure hunt. Photograph the same flower in different lighting conditions: Bright and diffused light; front light and back light. One nice thing about garden photography, you'll never be wanting for subject matter since flowers are more than happy to pose.
Thanks for visiting and please stop by again. I'll put the coffee on!
Meet Marion Owen /// Learn about PlanTea /// Online Catalog /// Articles, Tips, Recipes /// Get free UpBeet Gardener newsletter /// Read current issue /// Listen to radio show /// Read news and press releases /// More resources and links /// Learn why 'grow organic?' /// View guidelines for retailers /// Read love letters /// Book Marion as a speaker /// Site map /// How to link to us /// Contact us /// Go to home page
PlanTea: The organic plant food in tea bags. http://www.plantea.com
Copyright ©1996 to present: PlanTea, Inc. All Rights Reserved. PO Box 1980, Kodiak, AK 99615-1980 USA
Questions or comments? marion@plantea.com Phone: Toll Free: 1-800-253-6331 (US and Canada); 907-486-2500