
Seeding is Believing!
Tried-and-true tips
to successfully grow your own vegetable, flower and herb seedlings and save money in the process.
By Marion Owen, Fearless Weeder
for PlanTea, Inc. and
Co-author of Chicken Soup for the Gardener's Soul
FEATURE ARTICLE:

Tom Hanks' "Power of Four" solution
More good stuff:
Who is Marion Owen?
FAQs about PlanTea
Search Marion's articles, tips and recipes
Why grow organic?
News and press releases
Read love letters
How to link to this site
Need a speaker?
How to contact Marion
Visiting Alaska?
Come to Kodiak Island!
Go to home page

Marion's UpBeet Gardener
Newsletter has been
replaced by Marion's blog
which you can find at:
www.marionowen.wordpress.com
 Did you know you can cut your grocery bills in half by growing at least some of your own vegetables?
That's right. A packet of 500 lettuce seeds cost the same as one head of romaine lettuce and grows into 500 bags of pre-washed, bagged salad greens!
I've taught gardening classes for 20 years and I'm amazed at how many people hesitate to start their own seedlings. Not because it's too complicated (In that case, we wouldn't be driving cars or using computers). It's mostly because we're afraid to fail.
"What if I give them too much water?" You might ask. Or "What if I sow too many seeds?"
Perhaps, negative thoughts like these kick in:
- I've never started seeds on my own
- Everything I plant just dies
- I'm too old to grow my own seedlings
- I don't know where to start
- I have a brown thumb
- What will the neighbors think?
- I tried it once and it didn't work
Sound familiar? Truth is, one of our most limiting beliefs is the belief that we are not capable of accomplishing a goal, whatever it happens to be. For most of us, it's a matter of childhood programming which follows into adulthood. Our jobs, life at home and so on. We can get over that, even with starting seeds!
Good news! Plants WANT to grow!
And plants know what they're doing. You have that going for you. Like anything else, it helps to be passionate about seedlings: If you're not into it, then you won't succeed.
Believe it's possible and believe in yourself. Your brain is designed to solve any problem and reach any goal that you give it. Listen to Mark Twain: "The secret of getting ahead is getting started. The secret of getting started is breaking your complex, overwhelming tasks into small manageable tasks, and then starting on the first on."

Why it makes perfect sense to grow your own
Whether you have a full-sized garden or a window box, you can enjoy the fruits of your labors by growing your own vegetables, herbs and flowers. Starting your own plants from seed:
- You can cut your grocery bill in half by growing your own produce!
- Gives you access to an endless variety of plants
- You're in control of what you want to grow, and when--No waiting on the garden centers to make the decision for you!
- Save more money! A pack of 500 lettuce seeds cost the same as a head of romaine. What's more, that same packet of 500 lettuce seeds will produce 500 bags of pre-washed, bagged salad greens!
- Raising your own plants is one of the most satisfying aspects of gardening
Taking the mystery out of seed starting
Maybe, once upon a time, you tried starting a few seeds, but they flopped. Or, maybe you're thinking about growing tomatoes for the first time. Either way, you're in good company because while the process of seed germination may seem soooo complex, I'll make it reassuringly simple. In the article, we'll go over:
- When to start seeds indoors
- How to use a seed starting timetable for vegetables, flowers and herbs
- Containers and soil blockers
- The scoop on dirt
- How to prevent damping-off disease
- How to sow seeds (a pinch to grow an inch)
- How to raise seedlings (light, air, fertilizer, etc.)
- Transplanting to larger containers
- Transplanting outside
|
- - -
- - - - - - - - - - - - - - - - - |
As I said, we'll take things step by step. And if I've done my homework, once you've grown your own basil, broccoli or bee balm, you'll be hooked. Let's let's start with a little appreciation for:
Those amazing seeds
- Did you know that a single strawberry contains over 200 seeds?
- If you bought seeds by the ounce you would get 260,000 petunia seeds, 400,000 lobelia seeds, and 1,700,000 begonia seeds.
- What's the largest seed? The coconut.
|
- - -
- - - - - - - - - - - - - - - - - |

Lupine flowers in Alaska meadow
Seeds are living things. In fact, even when they're captives in jars and envelopes, seeds carry on respiration, absorbing oxygen and giving off carbon dioxide. The magic continues when you add water and seeds spring to life. . .
When to germinate seeds indoors
 To
plan the best time to start seedlings indoors, you need to know the frost
free date, which is the approximate date of your area's last spring
frost. This is the date you aim for as the time to transplant your seedlings
out in the garden. If you don't know your frost free date, ask local gardeners,
your cooperative extension agent, or inquire at a good garden center.
Now count backwards from that date the number of weeks indicated on the timetable below to figure out the starting date for various crops. For example, let's say your frost free date is May 1, and you want to grow broccoli. Looking at the table below, you see that broccoli should be started indoors 6 to 8 weeks before the frost free date. So, counting backwards, you'll need to sow your seeds somewhere around March 1 to March 15.
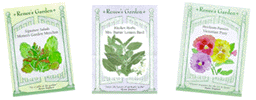
Renee's Garden seed packets
Seed packets and seed catalogs provide valuable information, including how and when to germinate seeds. The table below lists starting times for popular vegetables, flowers and herbs. I've placed an asterisk(*) to indicate a cold-hardy plant that can be set out 4 to 6 weeks before the last frost.
Growing vegetables- 12 to 14 weeks: onions*, leeks*, chives*, celery, globe artichoke
- 8 to 12 weeks: green onions*, peppers, eggplant, lettuce*
- 6 to 8 weeks: Swiss chard, mustard spinach*, Oriental greens*, cucumbers, tomatoes
- 4 to 6 weeks: cucumbers, cabbage family crops* (cauliflower, cabbage, broccoli, kale)
- 2 to 4 weeks: melon, okra, pumpkins, squash
- 20 weeks: fuchsia
- 12 to 14 weeks: pansies*, lobelia, coleus, impatiens, poppies
- 8 to 12 weeks: snapdragons, alyssum, petunia
- 6 to 8 weeks: calendula*, daisy, nemesia, ageratum and other hardy annuals
- 4 to 6 weeks: African daisy, marigolds, zinnias, cockscombs, godetia, nasturtium, bachelor button, dahlia, canary bird vine, sweet peas and other tender annuals
- 12 to 14 weeks: chives, oregano, mint, yarrow, parsley
- 8 to 12 weeks: thyme, chamomile, feverfew, valerian, catnip
- 6 to 8 weeks: dill, chervil, coriander, lemon balm, sage, arugula, savory, basil
Containers for starting seeds--save those yogurt cups
You can start seeds in almost any kind of container, provided it's 2 to 3 inches deep, with small drainage holes at the bottom. Take a look around the house and you'll discover great seed-starting containers like yogurt cups, cottage cheese tubs, and plastic salad trays from restaurants.
I don't recommend using egg cartons. They don't hold enough soil and they dry out too quickly. I'm also not keen about peat pellets. When soaked in water, these compressed wafers expand into fist-sized blocks. This might seem convenient, but cost per seedling is pretty high. Also, the outer mesh bag doesn't break down very well, especially in cool soils, so plants often become root bound.
|
- - -
- - - - - - - - - - - - - - - - - |
Soil blockers: My favorite way to start seedlings
I enjoy starting my own seedlings, but I found it somewhat tedious. Until I discovered soil blockers. Since 1985, my favorite way to start seedlings is in individual cubes of soil. When grown in cubes, seedlings are much easier to handle--you don't have to dig them out when you transplant them! Plus, you'll save money by not having all those extra containers around.

Soil "cookie cutter" punches out 20 soil cubes at a time.
Made in England from brass and sturdy plastic, the soil cuber works like a cookie cutter, punching out 20, 3/4-inch soil cubes at a time. Each seed or clump of seeds gets its own growing space (cube) which eliminates transplant shock and tangled roots. This heavy-duty tool will last you a lifetime and it's something you can use to impress your friends! You can purchase a soil blocker direct from my online store. Complete instructions are included and you can read them online.
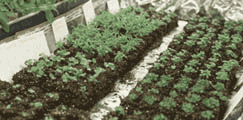
Seedlings grown in soil cubes under fluorescent lights.
Lights are kept 2 to 4 inches above tops of the seedlings.
Aluminum foil is used to reflect light.
When the seedlings are about 2 inches tall and have developed their second set of leaves, it's time to transplant them. Seedlings grown in soil cubes are easy to transplant. Simply pick up a cube and set it in a soil-filled container. The cube stays intact and since each seed or seed clump gets its own cube, the roots aren't disturbed and the plant doesn't suffer from transplant shock.
But I'm getting ahead of myself. Let's go over what to look for in a seed-starting soil.
After collecting your containers, the next step is to fill them with soil. Buy a good quality seed starting mix, available from any good garden center or nursery. Seed starting mixes are blended to drain well, yet retain moisture.
Here's an important tip: Avoid using soil from the garden. If placed in small containers, garden soil packs down and drains poorly. By using unsterilized garden soil, you also run the risk of introducing "damping-off," a disease that causes seedlings to rot at soil level and keel over. It's not a pretty sight. Seed starting mixes have been sterilized. (Seeds contain enough food to nourish themselves through the first stages of germination).
|
- - -
- - - - - - - - - - - - - - - - - |
Moisten the planting mix before you fill your containers. Seed starting
mixes are mostly peat moss, so allow time for it to absorb water. Scoop
pre-moistened mix into the containers to within 1/2 to 1 inch from the
top, then tap it gently to settle it in. Smooth the surface but don't
pack it down.
How to sow seeds, or a pinch to grow an inch
To sow seeds, make individual holes or tiny furrows with a pencil, chopstick or plant marker. Drop or sprinkle seeds onto the soil. Check your seed packets for specific sowing recommendations, but here are some general guidelines:- Sow large seeds (nasturtiums, sweet peas) at least 1 inch apart.
- Plant medium-sized seeds (lettuce, Swiss chard, marigold) 1/2 to1 inch apart.
- Plant tiny seeds about 1/4 to 1/2 inch apart.
To sprinkle tiny seeds evenly, shake them from the corner of the packet or pinch some seeds between your thumb and forefinger. When it comes to handling small seeds, I can be all thumbs. Then I discovered the #2 pencil, which has become my favorite seed starting tool. I think you'll be amazed, too.
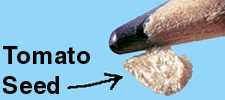
A tomato seed performs chin-ups on a pencil tip.
Pick up a sharpened, but dull-tipped pencil. Moisten the tip by touching it to the damp soil and then pick up one, or as many seeds as you like. It's so easy, you'll want to tell all your friends. To learn more about how a No. 2 pencil can do extraordinary things, especially for the gardener looking for the right tool to do the right job, read my article A Pencil is a Gardener's Best Friend.
Cover the seeds to a depth of about 3 times their thickness by sprinkling them with dry seed starting mix. (Tip: Shake dry soil from a parmesan cheese container). Spritz them with water and press down gently. Write a label for each kind of seed you plant and put it in the flat or container as soon as the seeds are planted.
Place the containers of planted seeds in a warm place where you can check them daily. You can cover them with plastic, but be sure to keep an eye on them. As soon as they germinate, remove the plastic.
How to raise a healthy litter of seedlings
Seedlings, like children and puppies, need constant attention. By providing the right amount of light, heat, air, and moisture you'll have a healthy litter, er uh, crop of seedlings that will thrive in the great outdoors. Here are some helpful pointers:
Light
Lack of light is the single, most common problem when raising seedlings.
And it's probably the #1 reason why people become discouraged over starting
their own seeds. Seedlings need more intense light than full-grown plants--14
to 16 hours a day is ideal. If they don't get enough light, or if the
light isn't intense enough, they become spindly, leggy and weak.

Seedlings need 14 to 16 hours of light per day
Windowsills are popular for starting seeds indoors, but they don't provide enough of the right light for healthy seedlings. Direct sun from a southern exposure can be too harsh, resulting in wilted plants. In northern latitudes, light might be in short supply, or the windowsills are too cold.
I prefer low-cost fluorescent shop lights over the coslty grow lights for raising seedlings. Suspend the lights from chains, keeping them 2 to 4 inches above the tops of the seedlings, adjusting the lights as they grow. You can also add aluminum foil reflectors. If you do use a sunny windowsill, remember to rotate your plants every couple days so they don't have to stretch and reach for the light. Seedlings that are pale and weak are light-starved.
Moisture
Water is the highway that delivers nutrients and seedlings need a steady
supply of it. Since dry air in a house or office can draw moisture right
out of soil, check your seedlings often. Poke your finger into the soil
or lift the containers. A container with dry soil weighs noticeably less
than one that's well watered. Also, when seedlings have matured, water
from the bottom to encourage roots to "reach for it." Last but not least,
nobody likes a cold shower, so use tepid rather than cold water!
Temperature
Seedlings thrive in an average room temperature of 60 to 70 degrees during
the day and dropping by about 10 degrees at night. Cool weather plants
such as lettuce, parsley and cabbage prefer cooler temperatures after
they reach 2 to 3 inches in height.
Air
and Ventilation
Proper ventilation is important for a number of reasons. It helps plants
"breathe" by circulating carbon dioxide and oxygen and it prevents damping-off
disease. Moving air also keeps pests at bay and it helps strengthen plant
stems, getting them ready for outdoor breezes. If necessary, set up a
fan. Generally a small one is all you need. Finally, if your containers
are covered with plastic or other covering, remove it as soon as the seeds
germinate.

Seedling showing second set of true leaves
Fertilizer
(no junk food served here!)
When seedlings have developed their second set of leaves, also called
their true leaves, this is a good time to give them small doses of plant
food. Organic fertilizers such as fish and kelp emulsions, compost tea
or PlanTea are ideal. Apply
fertilizers half-strength directly to the soil or as a foliar spray.
|
- - -
- - - - - - - - - - - - - - - - - |
Transplanting
to larger containers
Seedlings grow faster, develop better and are less prone to disease and bolting (prematurely going to seed) if they have plenty of space and good soil. When seedlings reach 2 to 3 inches tall and have developed their first set of true leaves, it's time to transplant them into larger containers. If you've every worn a pair of shoes that were too tight, you know how a plant feels when its roots are too crowded.
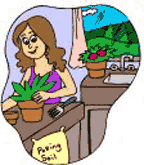
Fill the new containers with pre-moistened soil. Gently squeeze the bottom of the seed starting container or poke a fork down to the bottom and lift the seedling out. Try not to disturb the roots. For soil cubes, simply separate a cube from the others. Make a hole in the new container and nestle the seedling into its new home, pressing it down a little deeper than it was before. For tomatoes, broccoli and other cabbage plants you can actually bury the stem up to the bottom of the first leaves.
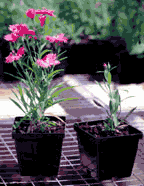
Gently press more soil around the seedlings and water them gently. Follow the tips listed above, continuing to provide the right amount of light, moisture, temperature, and air.
How to transplant seedlings outside
Before planting your seedlings out in the garden, you must prepare them for life outdoors. Sheltered plants are not accustomed to wind, direct sun, cold air, and see-saw temperatures. They will have a better chance of surviving if you help them develop tougher tissues before planting them outside. (Imagine a "couch potato" sports enthusiast from Hawaii moving to Alaska in the winter to participate in a 1,000 mile sled dog race. You get the picture).
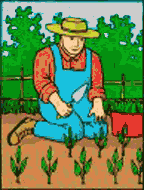
In a few weeks, when the soil and weather has warmed sufficiently, it's time to "harden off" your seedlings by gradually acclimating them to the great outdoor. Hardening off takes about a week. On the first day, set them outside in a shady spot, out of the wind, for a few hours. Then bring them back inside. Gradually increase their time outside to a half day, a full day, then 2 or 3 days. Give them a sun bath occasionally, too.
When your seedlings are well acclimated, the next step is to plant them outside in the garden. Wait for a foggy or overcast day, or plant them in the late afternoon. Seedlings will suffer less if they're not set out during a hot, sunny day. If you plant them while it's drizzling or just before a rain, they'll get off to a great start.

After planting out, keep an eye on the weather. You may need to protect
your seedlings from wind, frost or heavy rain by covering them with berry
baskets, floating row covers or plastic milk jugs, minus their bottoms.
Keep the young plants moist but not soggy, until their roots take hold.
Starting your own plants from seed is not only rewarding, it's fun! What's more, plants--like dogs and cats--don't care if you have a bad hair day! So give your seedlings all they need to get them started out on the right foot.
But what if you make a mistake?
"That's how a gardener learns," says Anne Raver, writer. "It's not like making a mistake with the baby that the psychotherapist will trace back directly to you 20 years later. Plants don't point a finger. If they live, they don't cary grudges. if they die, unless you've killed an entire species or a rain forest, you feel only momentary guilt, which is quickly replaced by a philosophical, smug feeling: Failure is enriching your compost pile."
Anne reminds us that experience is always in the positive, in that every experience has something to teach us. Rather than throw in the trowel when something doesn't go as you expected, ask yourself, "How do I use this experience to to my advantage? What lesson is here for me?"
Successful people look at every experience as an opportunity. Jack Canfield, co-creator of the Chicken Soup for the Soul series, says in his book, The Success Principles, "If you take the approach that 'good' is not an accident--that everyone and everything that shows up in your life is there for a reason--and that the universe is moving you toward your ultimate destiny for learning, growth, and achievement, you'll begin to see every event--no matter how difficult or challenging--as a chance for enrichment and advancement in your life."
Happy growing!
Marion Owen marion@ptialaska.net
Thanks for visiting and please stop by again. I'll put the coffee on!
Meet Marion Owen /// Learn about PlanTea /// Online Catalog /// Articles, Tips, Recipes /// Get free UpBeet Gardener newsletter /// Read current issue /// Listen to radio show /// Read news and press releases /// More resources and links /// Learn why 'grow organic?' /// View guidelines for retailers /// Read love letters /// Book Marion as a speaker /// Site map /// How to link to us /// Contact us /// Go to home page
PlanTea: The organic plant food in tea bags. http://www.plantea.com
Copyright ©1996 to present: PlanTea, Inc. All Rights Reserved. PO Box 1980, Kodiak, AK 99615-1980 USA
Questions or comments? marion@plantea.com Phone: Toll Free: 1-800-253-6331 (US and Canada); 907-486-2500